Recently I wanted to add a contenttype-specific custom action to the ribbonbar of a document-library. But the button didn't appear. After a short time of verifying and comparing IDs with SharePoint manager, I found the issue:
GuidGen in Visual Studio created me this GUID: 717EE0C46890438e8E245E7D4B4B7438 which I used for the sitecontenttype inheriting from document (0x010100). Then the list instance creates a listcontenttype from this and appends its own GUID. But the ID from the listcontenttype is 0x010100717EE0C46890438E8E245E7D4B4B743800E57C8E7D4D7D024C9A357907E925F14B.
So what's the difference between the root? Its the lower case character 'e'. It seems as if SharePoint would have a problem with case-sensitivity. Since I changed the lower 'e' to an upper 'E' in my sitecontenttype and customaction, the button is visible now.
So please pay attention for lower case characters and replace them when generating Guids with VisualStudio GuidGen.
Montag, 2. Mai 2011


Montag, 28. März 2011
MCPD: SharePoint Developer 2010 received
Finally Microsoft sent me a congratulation-mail that says, I'm now MCPD: SharePoint Developer 2010 certified. Cool.
Dienstag, 22. März 2011
Exam 070-573 passed!
I successfully finished this exam yesterday and may entitle myself TS: Microsoft SharePoint 2010, Application Development. Hooray!
Although it's commonly said, 070-576 is the more complex exam, I personally felt the TS-exam the harder one.
Now I'm awaiting for the MCPD: SharePoint Developer 2010 status set by Microsoft...
Although it's commonly said, 070-576 is the more complex exam, I personally felt the TS-exam the harder one.
Now I'm awaiting for the MCPD: SharePoint Developer 2010 status set by Microsoft...
Mittwoch, 16. März 2011
No two choices should have the same ID
In any case avoid create different fields with the same Guid OR - and this is important - the same internal name.
This is never checked by the solution packaging mechanism or while adding or installing the solution to the solution store. The errormessage "No two choices should have the same ID" occurs, if you for e.g. try to add an existing field to a sharepoint list.
Be sure to check this from time to time during development-process and before setup your solution to the production server. If the system is up and running, it's very difficult to do changes here...
This is never checked by the solution packaging mechanism or while adding or installing the solution to the solution store. The errormessage "No two choices should have the same ID" occurs, if you for e.g. try to add an existing field to a sharepoint list.
Be sure to check this from time to time during development-process and before setup your solution to the production server. If the system is up and running, it's very difficult to do changes here...
Freitag, 14. Januar 2011
Just passed Exam 070-576
Yeeehaa, I just passed Microsoft's Exam 070-576 (PRO: Designing and Developing Microsoft SharePoint 2010 Applications).
Sonntag, 14. November 2010
How to use custom form templates in NewForm.aspx/EditForm.aspx
A main criterion that distinguishes websites between good and bad usability is the way, how users can enter data to forms.
Imagine a list with around 15 or more fields. Now a user creates an initial item for that he only enters a few metadata to the item like title, description and a date. After that, another user modifies that item and adds some other field-values. And at last but not least, a third user completes the form by entering all missing values. So you want to show specific fields related to users or roles. Wrap that by a workflow with email-notifications if you want but that’s not the topic of my post.
By default, you have a newform.aspx/editform.aspx that displays all those 15 fields which is not quite necessary for the first user. The second user should not see those metadata-fields the first user entered during initial creation and the last user fills the last values.
Finally you really want to impress your customer so the fields in the form are grouped by context in a multi-columned table and have some stylish images around.
So how would you do that without creating your own applicationpage with onClick-eventhandling on the submit-button and managing saving all the field-values to the item by your own?
“Use custom form templates!” is the answer.
So how do we do that?
At first, it’s important to know that the default-template that’s displayed if you enter the NewForm.aspx or the EditForm.aspx is called ListForm and can be found in 14-Hive\TEMPLATE\CONTROLTEMPLATES\DefaultTemplates.ascx.
In that RenderingTemplate the typical design you know from the xxxForm.aspx is rendered here. Pay attention to the WebControl
For this experiment, I created a new Blank Site Collection with english language where I set my upcoming project to. Create a new Empty SharePoint Project in your Visual Studio 2010 and set its destionation Site Url to the just created Site Collection. Now add an item Content Type to your project and set Item as base content type. Now add an item Empty Element named “fields” to that content type.
 |
This is our project structure so far |
In its Elements.xml we add some fields that we want to use in our list later:
<Field ID="{42DEFD29-4A11-4fd7-958A-137049381E53}"
Name="TestTextfeld"
StaticName="TestTextfeld"
DisplayName="TestTextfeld"
Type="Text"/>
<Field ID="{3B6982AF-7B93-4b3c-95BB-3D90E03E30EC}"
Name="TestDatetime"
StaticName="TestDatetime"
DisplayName="TestDatetime"
Format="DateOnly"
Type="MyDateTimeField"/>
<Field ID="{B3C1A58F-9583-410d-BA4B-5545E37565F1}"
Name="TestBoolean"
StaticName="TestBoolean"
DisplayName="TestBoolean"
Type="Boolean"/>
<Field ID="{273D7F41-BB9D-4537-AF66-477A0FA09CC9}"
Name="TestChoice"
StaticName="TestChoice"
DisplayName="TestChoice"
Type="Choice">
<CHOICES>
<CHOICE>1</CHOICE>
<CHOICE>2</CHOICE>
<CHOICE>3</CHOICE>
</CHOICES>
</Field>
<Field ID="{EB57DC41-A510-442a-83DE-09D01462914E}"
Name="TestUserField"
StaticName="TestUserField"
DisplayName="TestUserField"
Type="User"/>
</Elements>
After that, reference those fields in your ContentType. Your Elements.xml now should look like this:
<Elements xmlns="http://schemas.microsoft.com/sharepoint/">
<!-- Parent ContentType: Item (0x01) -->
<ContentType ID="0x01000db7705609a14adeacf933a7ce690bb8"
Name="SharePointProject1 - ContentType1"
Group="Custom Content Types"
Description="My Content Type"
Inherits="FALSE"
Version="0">
<FieldRefs>
<FieldRef ID="{42DEFD29-4A11-4fd7-958A-137049381E53}" Name="TestTextfeld"/>
<FieldRef ID="{3B6982AF-7B93-4b3c-95BB-3D90E03E30EC}" Name="TestDatetime"/>
<FieldRef ID="{B3C1A58F-9583-410d-BA4B-5545E37565F1}" Name="TestBoolean"/>
<FieldRef ID="{273D7F41-BB9D-4537-AF66-477A0FA09CC9}" Name="TestChoice"/>
<FieldRef ID="{EB57DC41-A510-442a-83DE-09D01462914E}" Name="TestUserField"/>
</FieldRefs>
</ContentType>
</Elements>
Now comes the cool part: after the closing </FieldRef>-Tag add this xml-snippet:
<XmlDocuments>
<XmlDocument NamespaceURI="http://schemas.microsoft.com/sharepoint/v3/contenttype/forms">
<FormTemplates xmlns="http://schemas.microsoft.com/sharepoint/v3/contenttype/forms">
<Display>ListForm</Display>
<Edit>CType1CustomForm</Edit>
<New>CType1CustomForm</New>
</FormTemplates>
</XmlDocument>
</XmlDocuments>
CType1CustomForm is the new RenderingTemplate we want to use for edit and new. Display we do ignore for the moment; show the item in the default way by ListForm. It’s important to set the Inherits-Attribute to FALSE or the custom form templates are ignored, no matter, what you enter here. If you need to inherit from another content type, you also can set the formTemplates by code, for e.g. in a Feature Receiver:
SPContentType ctype = spWeb.ContentTypes[new SPContentTypeId("0x01000db7705609a14adeacf933a7ce690bb8")];
ctype.NewFormTemplateName = "CType1CustomForm";
ctype.EditFormTemplateName = "CType1CustomForm";
ctype.Update(true);
ctype.NewFormTemplateName = "CType1CustomForm";
ctype.EditFormTemplateName = "CType1CustomForm";
ctype.Update(true);
Pay attention that the approach of setting custom templates to each content types makes it possible to individualize the form for every content type in your list. No more inappropriate fields. :-)
So now it’s time to create the Template. Add a new SharePoint Mapped Folder and set it to {SharePointRoot}\TEMPLATE\CONTROLTEMPLATES.
Add a new User Control to this folder and remove its .cs-Files. In my example, I named it CType1CustomForm.ascx. From the SharePoint DefaultTemplate.ascx (found in 14-Hive\TEMPLATE\CONTROLTEMPLATES) I copied that Part beginning with <SharePoint:RenderingTemplate id="ListForm" runat="server"> and ending with </SharePoint:RenderingTemplate> into the new user control.
To proof, that now this Template is used by our content type, I added the Term “CType1CustomForm” after the <span id='part1'>-Tag which is displayed first in the dialog’s contentarea.
<ListInstance Title="SharePointProject1 - ListInstance1"
OnQuickLaunch="TRUE"
TemplateType="10000"
Url="Lists/SharePointProject1-ListInstance1"
Description="My List Instance">
<Data>
<Rows>
<Row>
<Field Name="TestTextfeld">Text im Textfeld</Field>
<Field Name="TestDatetime">2010-10-28T11:00:00Z</Field>
</Row>
</Rows>
</Data>
</ListInstance>
If you want, you can test the progress so far by pressing F5 and click “Add new item” in the list. You should see something like this:

Okay, the half of the job is done. Now we want to rearrange the lame display of the fields.
For that purpose, add another User Control to the mapped CONTROLTEMPLATES-folder but this time leave all the automatically created Code-Behind-Files. In my case, I named it MyCustomForm.ascx.
<SharePoint:FolderFormFields ID="FolderFormFields1" runat="server"/>
<!-- myCustomForm -->
<myCustomForm:AddForm runat="server" />
<!-- myCustomForm -->
<SharePoint:ListFieldIterator ID="ListFieldIterator1" runat="server"/>
<!-- myCustomForm -->
<myCustomForm:AddForm runat="server" />
<!-- myCustomForm -->
<SharePoint:ListFieldIterator ID="ListFieldIterator1" runat="server"/>
Don’t forget to register the tag in the directives-area:
<%@ Register TagPrefix="myCustomForm" TagName="AddForm" src="~/_controltemplates/MyCustomForm.ascx" %>
All the fields, which are added in MyCustomForm.ascx will not be rendered by the ListFieldIterator again. But if your customer adds new fields to the list after you installed the solution, those new fields are rendered fine like the default-forms below your customizations.
Now let’s come to the MyCustomForm.ascx.
In this User template, I created a HTML-Table where I placed all the SharePoint-WebControls to render the fields, for e.g:
<table width="700px">
<tr>
<td>
<asp:Label ID="Label5" runat="server" Text="Title" />
</td>
<td>
<SharePoint:TextField ID="Title" runat="server" FieldName="Title" />
</td>
<td>
</td>
<td>
<asp:Panel ID="bild" runat="server"></asp:Panel>
</td>
</tr>
<tr>
<td>
<asp:Label ID="Label1" runat="server" Text="Textfeld" />
</td>
<td>
<SharePoint:TextField ID="TextField1" runat="server" FieldName="TestTextfeld" />
</td>
<td>
<asp:Label ID="Label2" runat="server" Text="Datetime" />
</td>
<td>
<SharePoint:DateTimeField ID="DateTimeField1" runat="server" FieldName="TestDatetime" />
</td>
</tr>
<tr>
<td>
<asp:Label ID="Label6" runat="server" Text="Userfeld" />
</td>
<td>
<SharePoint:UserField ID="UserField" runat="server" FieldName="TestUserField" />
</td>
<td></td>
<td></td>
</tr>
<tr>
<td>
<asp:Label ID="Label3" runat="server" Text="Boolean"/>
</td>
<td>
<SharePoint:BooleanField runat="server" FieldName="TestBoolean" ID="booleanField" /> (Check this box to see more settings)
</td>
<asp:TableCell ID="choiceLabel" runat="server">
<asp:Label ID="Label4" runat="server" Text="Choice"/>
</asp:TableCell>
<asp:TableCell ID="choiceField" runat="server">
<SharePoint:RadioButtonChoiceField ID="RadioButtonChoiceField1" runat="server" FieldName="TestChoice" />
</asp:TableCell>
</tr>
</table>
As you can see, it’s quite simple to add the field controls. It’s important, to set the correct FieldName. If the FieldName-Values doesn’t match the internal fieldnames, SharePoint can’t map them and displays the control by the ListFieldIterator instead of your code.
You can also use your own custom fields here. To demonstrate, I created a new custom field by inheriting from the default DateTime-field to show the user an error-message, if the entered date is lower than the current date. Because my custom field inherits from SPFieldDateTime, I can display it by using
<SharePoint:DateTimeField ID="DateTimeField1" runat="server" FieldName="TestDatetime" />
In the wired CodeBehind I added some functionality to toggle the visibility of the radiobuttons-field depending on the checkbox-state. Don’t be worried, to provide you a sum of all the written above, I attach the sourcecode for download below.
Following a picture of the final result:

As you can see, the content of the NewForm/EditForm is completely different from the default-style. As I described earlier, the ListFieldIterator adds new not referenced fields below until you update the user control:

Hint: If you get an exception during F5-debugging when you entered an invalid date, like you can see on the following screen, just ignore it by hitting the run-button. It seems like this way (throwing an exception on field-validation) is the Microsoft-preferred way to handle invalid field-values:
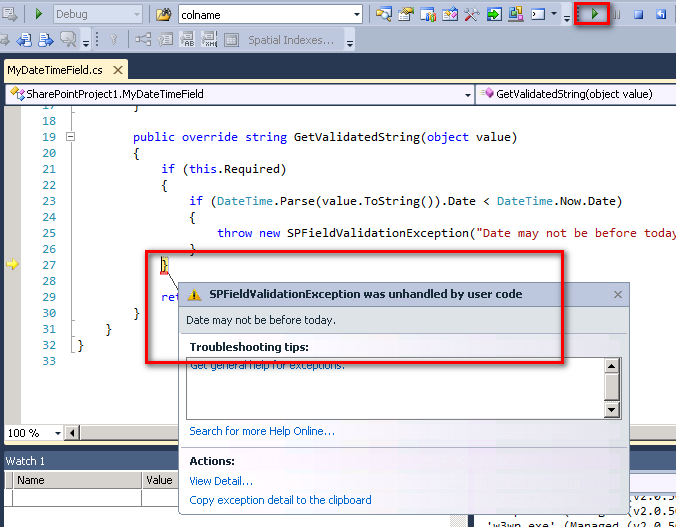
The exception-message is the red-displayed error-message below the validated field.
The complete Visual Studio-Project can be downloaded from codeplex (my first codeplex-project, yehaa!): http://customformtemplates.codeplex.com
I hope, you’ll find this design-possibility as much as useful and exciting as I did when I discovered it.
Happy coding!
Donnerstag, 11. November 2010
ExcelServices "You do not have permissions to open this file."
Today I spent hours to solve a problem most annoying. I walked through Microsoft's tutorial you can find here how to use SharePoint 2010 Excel Services to open an Excelsheet uploaded to a SharePoint-Library.
I implemented the not really complex example with the result... that nothing worked like expected. Always when the debugger was in the line of sessionId = es.OpenWorkbook(...), I've got an exception with the nothing-telling message "You do not have permissions to open this file.".
So I searched for solutions and hints at Google but all those tips there (change Excel Service Application-Settings, modify Trusted Locations, etc.) didn't work.
At last I tried something, I had in mind all the time but somehow it was too obvious that it wouldn't be the solution for my problem. And ha! As I tried anyway just for fun, it suddenly worked.
All I did, was to change the Location Type for my library in which the excel was uploaded to "HTTP". All the time before it didn't worked, this setting for here was "Microsoft SharePoint Foundation".

I implemented the not really complex example with the result... that nothing worked like expected. Always when the debugger was in the line of sessionId = es.OpenWorkbook(...), I've got an exception with the nothing-telling message "You do not have permissions to open this file.".
So I searched for solutions and hints at Google but all those tips there (change Excel Service Application-Settings, modify Trusted Locations, etc.) didn't work.
At last I tried something, I had in mind all the time but somehow it was too obvious that it wouldn't be the solution for my problem. And ha! As I tried anyway just for fun, it suddenly worked.
All I did, was to change the Location Type for my library in which the excel was uploaded to "HTTP". All the time before it didn't worked, this setting for here was "Microsoft SharePoint Foundation".
Abonnieren
Posts (Atom)


